Make a Digital Weather Station Using DHT11 and DHT22 Sensor and OLED Display
Make a Digital Weather Station Using DHT11 Sensor and OLED Display
Are you looking for an exciting DIY Arduino project that is both educational and practical? Building a digital weather station using a DHT11 sensor and OLED display is a great beginner-friendly electronics project. This smart weather station can measure temperature and humidity in real-time and display the data on a compact OLED screen. Whether you are a student, electronics hobbyist, engineer, or Arduino beginner, this project will help you understand sensors, displays, and microcontroller programming in a hands-on way.
What is a Digital Weather Station?
A digital weather station is an electronic system that measures environmental conditions such as:
Temperature
Humidity
Air pressure (advanced versions)
Weather conditions
In this project, we will use a DHT11 sensor to monitor temperature and humidity and display the readings on an OLED display using an Arduino board.
Why Build an Arduino Weather Station?
Building an Arduino weather station project offers many benefits:
✅ Learn Arduino programming basics
✅ Understand sensors and data monitoring
✅ Improve electronics prototyping skills
✅ Create a real-world useful project
✅ Perfect for school, college, and DIY learning
This project is especially useful for STEM education, science exhibitions, and beginner electronics training.
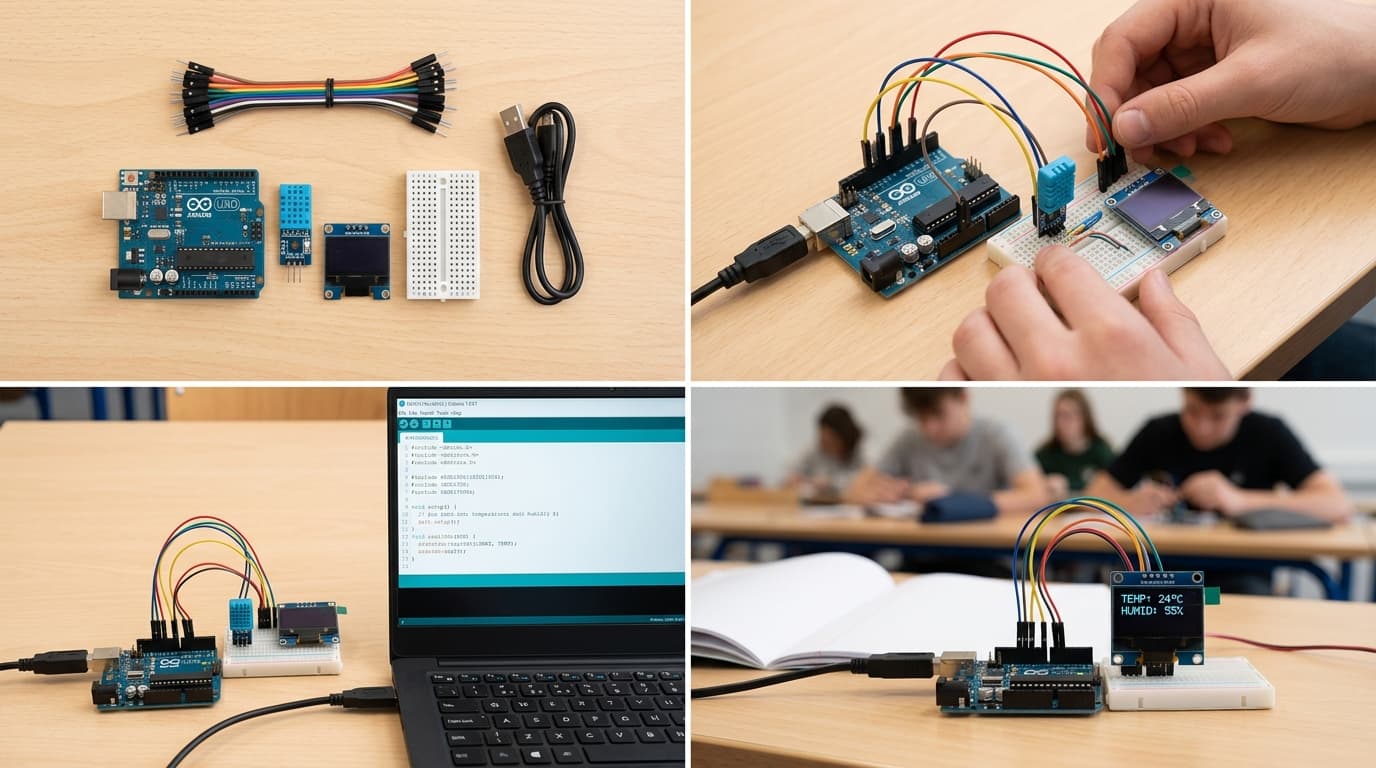
Components Required
To make a digital weather station using DHT11 and OLED display, you need the following components:
Arduino Uno
DHT11 Temperature & Humidity Sensor
OLED Display (I2C)
Breadboard
Jumper Wires
USB Cable
Computer/Laptop with Arduino IDE
Using these basic components, you can quickly build your own smart weather monitoring system.
How Does the Weather Station Work?
The working principle is simple:
The DHT11 sensor detects temperature and humidity from the environment.
Arduino processes the sensor data.
The OLED display shows live temperature and humidity values.
The system continuously updates the readings in real-time.
This makes it a practical mini weather monitoring system for homes, classrooms, and laboratories.
Features of This DIY Weather Station
Here are some exciting features of this project:
✔ Real-time temperature monitoring
✔ Humidity measurement
✔ Compact OLED digital display
✔ Beginner-friendly Arduino coding
✔ Low-cost and easy-to-build design
✔ Expandable for IoT and smart home projects
You can later upgrade this project by adding:
Wi-Fi monitoring
Data logging
Mobile app control
Weather alerts
Circuit Connection Overview
The wiring setup is easy for beginners.
DHT11 Sensor Connection
VCC → 5V
GND → GND
DATA → Arduino Digital Pin
OLED Display (I2C) Connection
VCC → 5V
GND → GND
SDA → A4
SCL → A5
Always double-check your connections before uploading code.
Arduino Programming for Weather Station
After completing the wiring:
Install the DHT sensor library in Arduino IDE.
Install the Adafruit SSD1306 OLED library.
Upload the weather station code to Arduino Uno.
Observe live readings on the OLED display.
The OLED screen will instantly show temperature in °C and humidity percentage (%).
Applications of Digital Weather Station
This project can be used for:
Home temperature monitoring
School and college science projects
Electronics learning workshops
Smart agriculture systems
Greenhouse monitoring
DIY IoT experiments
It is one of the best Arduino projects for beginners because it combines sensors, displays, and coding in one project.
Final Thoughts
Building a digital weather station using DHT11 sensor and OLED display is a fun and educational Arduino project. It teaches valuable electronics and programming skills while creating a useful real-world application.
If you are starting your journey in Arduino, DIY electronics, robotics, or IoT, this weather station project is an excellent place to begin.Start building your own smart weather station today and explore the world of electronics innovation!